
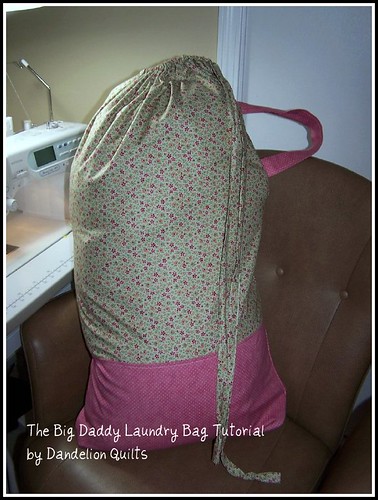
XL Big Daddy Laundry Bag:
Top of Bag (main focus fabric): 24 1/2 inches X WOF (Width of Fabric)
Bottom of Bag (secondary focus fabric): 12 inches X WOF
Lining: 37 1/2 inches X WOF
Handle (optional): 6 inches X 15 inches inches
Drawstrings: 3 inches X WOF (cut 2)Step 1: Pin and sew the bottom of the outer bag to the top of the outer bag (RST = right sides together). Press open. The outer fabric should now be the same size as the lining. If not, trim.

Step 2: Pin the outer fabric and the lining piece together (RST). Sew all 4 sides, leaving a 5 inch hole in the bottom for turning.

Before you turn the bag, snip all 4 corners to decrease bulk. Reach into the 5 inch hole, and pull the bag right sides out. Make sure to push out all corners and seams. Iron. Fold the raw edges of the hole inside and stitch shut.
Step 3: Fold the top of the bag over (towards the lining) 1 1/2 inch. Pin. Sew down. This will create the pocket for your draw string. You will want to fold over an 1 1/2 despite the photo below. It will make the drawstring step easier.

At this time you may wish to top stitch across the outer bag where the bottom connects to the top to add support to the seam. (optional)

Step 4: Sew your handle (optional). Take your handle piece. Iron the end pieces (6 inch sides) in half an inch.

Now, iron the piece in half the long way.

Open. Now fold each raw edge in so they meet in on that crease you created.

At this time you may want to slip in a 1 1/2 inch X 18 inch piece of interfacing.

Fold and iron in half. Stitch around the open edges.

Step 5: Create your drawstrings. Sew the two 3 inch pieces together on one end (RST). Press open. Now press them in the same manner you did the handle and stitch. This creates about a one inch finished "string".

Step 6: Measure down the side of your bag 5 inches from the top of your bag. This is where you will pin one end of your handle. Measure down the side of your bag 10 inches from the top of your bag. Pin the other handle end there.


Now fold the other side of your bag over (RST) on top of your handles. Pin the sides and the bottom of the bag. STARTING at the 1 1/2 stitch line (the draw string pocket) stitch down the side of the bag and across the bottom. BE sure to reinforce the stitching at the top and the handles several times. DO NOT sew the drawstring pocket shut. Start after it.
Step 7: Now you have to box the bottom of the bag. With the bag still inside out, pinch the bottom corner and center the seam. See below. It is very important that the seam is centered.
Lay the pinched corner on your cutting board. You want to measure exactly 2 1/2 inches from the tip of the corner and draw a line across the corner of the bag. This will be your sewing line and will give your bottom a a nice, square bottom. Lift up your ruler and pin to secure. Repeat this process for the other side of your bag (which does not have a side seam, so you will have to be careful) and both corners on your lining.

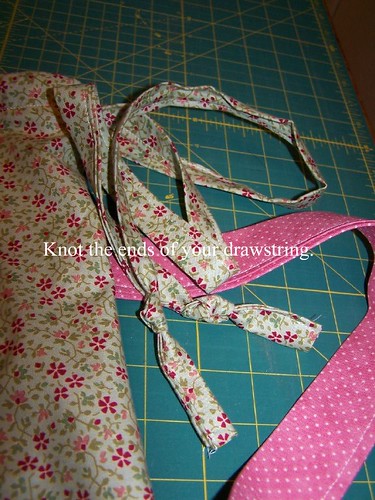
Step 8: Turn right side out. Thread your drawstring through your pocket. I use a safety pin on one end to assist in this.

Top of Bag (main focus fabric): 19 1/2 inches X WOF (Width of Fabric)
Bottom of Bag (secondary focus fabric): 12 inches X WOF
Lining: 32 1/2 inches X WOF
Handle (optional): 6 inches X 15 inches inches

Knot the ends of your strings. Your bag is done!
If you think this laundry bag is a bit long for your taste, here are the measurements for the Large Big Daddy Laundry Bag.
Large Big Daddy Laundry Bag
Top of Bag (main focus fabric): 19 1/2 inches X WOF (Width of Fabric)
Bottom of Bag (secondary focus fabric): 12 inches X WOF
Lining: 32 1/2 inches X WOF
Handle (optional): 6 inches X 15 inches inches
Drawstrings: 3 inches X WOF (cut 2)
Other ideas:
- you could place a pocket on the front of the bag
- embroider the front of the bag.
- you could put a shoulder strap on it instead of a handle
- use ribbon or small rope instead of making drawstrings
10 comments:
Great idea for a kid going off to college!!!
Very nice!!!! I'll have to make one.
Very cute Kris! I agree -- I think it would be a great graduation gift -- and fun to make in their new school colors!
Excellent graduation gift- thanks for the great tutorial, Kris!
What a perfect graduation gift! Love it! Great tutorial!
Great project and tutorial!!! Your apron turned out so cute!! Thanks for co-hosting such a fun sewing day!
What a GREAT tutorial. I love it. I'm going to come back and use it to make one for my son when he heads off to college! Great idea!!
What lovely material, thanks for he tutorial.
Great Bag!! Great idea Thimbleanna to use the school colors. But please don't make me do the laundry that would fit in it!! UGH!!
What a great tutorial :) Wonderful gift idea!
Post a Comment