Saturday, January 29, 2011

The Big Daddy Laundry Bag- Tutorial

This laundry bag would make a great graduation gift. 

XL Big Daddy Laundry Bag:


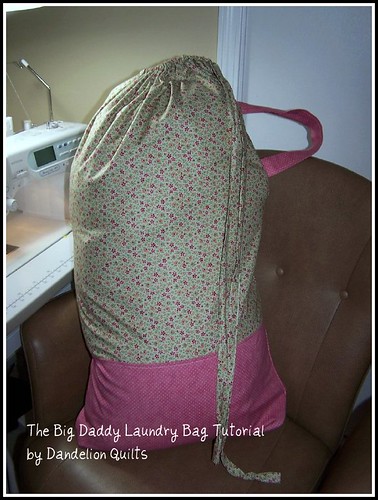
Finished picture
Cut:
Top of Bag (main focus fabric): 24 1/2 inches X WOF (Width of Fabric)
Bottom of Bag (secondary focus fabric): 12 inches X WOF
Lining: 37 1/2 inches X WOF
Handle (optional): 6 inches X 15 inches inches
Drawstrings:  3 inches X WOF (cut 2)

Step 1:  Pin and sew the bottom of the outer bag to the top of the outer bag (RST = right sides together).  Press open.  The outer fabric should now be the same size as the lining.  If not, trim.


Step 2:  Pin the outer fabric and the lining piece together (RST).  Sew all 4 sides, leaving a 5 inch hole in the bottom for turning.

Before you turn the bag, snip all 4 corners to decrease bulk.  Reach into the 5 inch hole, and pull the bag right sides out.  Make sure to push out all corners and seams.  Iron.  Fold the raw edges of the hole inside and stitch shut.

Step 3:  Fold the top of the bag over (towards the lining) 1 1/2 inch.  Pin.  Sew down.  This will create the pocket for your draw string.  You will want to fold over an 1 1/2 despite the photo below.  It will make the drawstring step easier.


At this time you may wish to top stitch across the outer bag where the bottom connects to the top to add support to the seam.  (optional)


Step 4:  Sew your handle (optional).  Take your handle piece.  Iron the end pieces (6 inch sides) in half an inch. 

Now, iron the piece in half the long way. 

Open.  Now fold each raw edge in so they meet in on that crease you created. 


At this time you may want to slip in a 1 1/2 inch X 18 inch piece of interfacing. 

Fold and iron in half.  Stitch around the open edges. 

Step 5:  Create your drawstrings.  Sew the two 3 inch pieces together on one end (RST).  Press open.  Now press them in the same manner you did the handle and stitch.  This creates about a one inch finished "string".

Step 6:  Measure down the side of your bag 5 inches from the top of your bag.  This is where you will pin one end of your handle.  Measure down the side of your bag 10 inches from the top of your bag.  Pin the other handle end there. 


Now fold the other side of your bag over (RST) on top of your handles.  Pin the sides and the bottom of the bag.  STARTING at the 1 1/2 stitch line (the draw string pocket) stitch down the side of the bag and across the bottom.  BE sure to reinforce the stitching at the top and the handles several times.  DO NOT sew the drawstring pocket shut.  Start after it. 

Step 7:  Now you have to box the bottom of  the bag.  With the bag still inside out, pinch the bottom corner and center the seam.  See below.  It is very important that the seam is centered.

Lay the pinched corner on your cutting board. You want to measure exactly 2 1/2 inches from the tip of the corner and draw a line across the corner of the bag. This will be your sewing line and will give your bottom a a nice, square bottom. Lift up your ruler and pin to secure. Repeat this process for the other side of your bag (which does not have a side seam, so you will have to be careful) and both corners on your lining.
Step 8:  Turn right side out.  Thread your drawstring through your pocket.  I use a safety pin on one end to assist in this. 

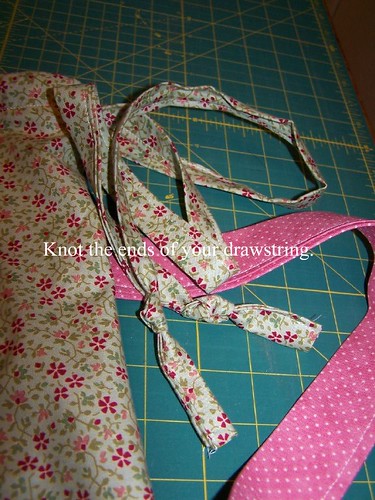
Knot the ends of your strings.  Your bag is done!

100_6349.jpg

If you think this laundry bag is a bit long for your taste, here are the measurements for the Large Big Daddy Laundry Bag.

Large Big Daddy Laundry Bag

Top of Bag (main focus fabric): 19 1/2 inches X WOF (Width of Fabric)

Bottom of Bag (secondary focus fabric): 12 inches X WOF
Lining: 32 1/2 inches X WOF
Handle (optional): 6 inches X 15 inches inches
Drawstrings: 3 inches X WOF (cut 2)

Other ideas:
  • you could place a pocket on the front of the bag
  • embroider the front of the bag.
  • you could put a shoulder strap on it instead of a handle
  • use ribbon or small rope instead of making drawstrings

A finish- and sincere gratitude

Well, first of all...I really want to thank each of you that commented on my earlier issue.  Such good suggestions and I promise, I will give them a try. 

So, I finished the apron.  It turned out very cute. 

I really love the ruffle with those retro flowers on it.  I wish I had more of that fabric.  CUTE. 

Apron update and a question

I really do like this pattern.  If you like aprons or are looking for a quick and easy gift, then this one is for you.  I was zipping right through it right up to the gathering.  My thread kept snapping.  UGGH.  I tried doing 2 basting stitches and pulling them at the same time for extra support.  I switched threads.  I loosened my tension.  I just don't know what else I could have done.  Any suggestions?  I have never had this problem before.

Anyway, this is where I am:


I have my straps sewn and pressed.  I need to sew the ruffles to the main body and then attach the straps.  How are your projects coming along today?

So you wanna have a party?

 Welcome!  Kelly and I are co hosting a sewing party today! I hope you will join in the fun!  Would  you like to participate?  Good news, you still can!  Head over to Kelly's to catch all the details.


We're sewing from 1-5 today!   My word was tranquilI decided that I am most tranquil when I am creating something.  So, I am going to sew a half apron for myself that I can wear when I am baking.  I really like to bake or cook when I am a bit stressed. 

Here are my fabrics:

Aren't they cute?  I will tell you what wasn't so cute, when I went to cut them today I realized they shop lady that cut them was a bit stingy.  So all of my measurements are a bit off.  The straps are a bit narrower.  The ruffles a bit shorter.  Uggh.  I will make a note on the pattern to buy a little bit more next time.  It would have been okay had she cut straight, but her cuts were very slanted and wasted 1/2 inch to an inch of material.  I was a bit disappointed to learn that.  But, I am tranquil today, right?  So I am moving on with it.

For you pattern junkies, this pattern is called French Flea Market Apron by Busy Bee Quilt Designs.  You can find it at the link. 

Okay, so I have a few things left to wrap up before I start to sew.  I will come check out what you've been working on this afternoon. Kelly has the Mister Linky up.  So head on over there an link yourself up!

A big thanks to Kelly for all of the work she will put in today.  She sure makes it fun to be a community of sewers, doesn't she?

Thursday, January 27, 2011

Cookie Recipe- you could eat the whole pan

I had to make a snack to send into Buddy's classroom.  Hmm.  What to make?  Well, I have a feeling most first graders like chocolate chip cookies.  So, I whipped up a big batch of my friend Esther's chocolate chip bar cookies.  Let's all say hello to Esther.....she sometimes visits me here in blogland.  :)  Hi, Esther!!  Esther is the sweetest.  Maybe sometime she'll let me pass along her sugar cookie recipe to you....delicious!

I normally make these in 2 pizza pans as it calls for, but for little hands I thought bars would be better.  These are the softest, bestest (yup, I am going to throw out the non-existent word) cookie in the world, mostly thanks to the cream cheese.  My mom would make me these cookies and ship them in a pizza box to me at college...they were always a huge hit.  In fact, I think she even sent the second cookie a time or two to the boys next door.  It ships well and the cream cheese keeps them soft for days if tightly wrapped.  You could even pipe on a message if you wanted it for a special event like they do in the mall cookie shops.  Anyway, here is the recipe for the cookies. 

Esther's Pizza Chocolate Chip Cookies

1 c butter softened
3/4 c brown sugar
3/4 c sugar
1 package cream cheese- 8 ounces
1 tsp vanilla
2 eggs
2 1/4 c flour
1 tsp baking soda
1/4 tsp salt
1 package of Nestle semisweet chocolate chips
1 c chopped walnuts optional (I did not use these)

Preheat oven to 375 degrees.  Lightly grease 2 pizza pans (or 1 large cookie sheet).  Cream butter, sugars, cream cheese, vanilla, and eggs.  Combine flour, salt, and soda in separate bowl.  Add to cream mixture slowly.  Stir in chips and nuts.  Divide dough evenly in half and spread on each pizza pan.  Bake 20-25 minutes or until lightly brown around edges.  Cool completely in pans on wire racks.  Cut slim wedges with your pizza cutter.  

Happy baking!  Kris

Monday, January 24, 2011

Three Bean Chili

Since it is cold enough here to freeze your nose hairs, I decided to make this favorite chili of mine.  It all goes back to when I was a senior in high school.  I attended this really cool summer camp on Lake Michigan with campers from all over the world.  It was a neat experience, let me tell you.  (I still have one special friend who I still send Christmas cards to.)  But typical of Michigan, mother nature decided to throw in a week of fallish weather.  Since I hadn't packed too many warm items to wear, I hit the soup bar almost every day.  They had a vegetarian 3 Bean Chili with zucchini in that I really, really liked. 

Years later, I was flipping through a Family Circle magazine and came across a similar recipe.  BTW, found this picture on the Internet since I forgot to take my own...we are going to call it close enough!  LOL


Here is my version of that:

3 Bean Chili

1 can red kidney beans, drained and rinsed
1 can black beans,drained and rinsed
1 can northern beans, drained and rinsed
2 cans (28 ounces each) of petite diced tomatoes
1/4 c ketchup
2 diced zucchini, small
1 diced onion, medium
2 sweet bell peppers, chopped
2 garlic cloves, chopped
2 TBSP chili powder, 3 if you like it hot
1 TBSP EVOO
1/2 tsp oregano
Cheddar cheese and sour cream for garnish

In a large stock pot, saute olive oil, garlic, chili powder, and onions for 3 minutes.  Add peppers and zucchini and continue to saute for 5 minutes.  Stir in tomatoes, ketchup, and oregano.  Cook for 8 minutes over medium heat.  Stir in the beans.  Cover pot and cook for 3 minutes.  Garnish if desired. 


***********
If you are by chance following the NEW Weight Watchers Points Plus program, it is 8 points for 2 and 1/2 ladles of this soup, without the garnish. 


Saturday, January 22, 2011

Word Up Sewing Party- Don't be left out

So, Kelly and I are cohosting a sewing party!  Hooray.  Do a dance.  I think you get it.  I am pretty excited about this. 

Would  you like to participate?  Good news, you still can!  Head over to Kelly's to catch all the details.  Here is a brief taste of the event:

Party Details

Who: All "Word Up Girls" (It's not too late to choose a word if you'd like).

When: Saturday, January 29 (Kelly & I will be there from 1 to 5 p.m CST - maybe longer -feel free to come early or stay late)

Where: Charming Chatter blog. We'll be using Mr. Linky to stay in touch.

Bring: A sewing project that will be a reminder of you "Word" for the year and snacks.

You can make anything - a sign, a mini quilt, a pincushion or even work on a big quilt. It can have your word on it - but it doesn't have to include your word. It should be something that will remind you of your word and what you're trying to cultivate in your life this year! Oh, and snacks - can't have a sewing party without snacks!

So, if you're free, mark your calendars - get a project together and join us for the fun next Saturday!

****************
Note from Kris:  Seriously, if you haven't picked a word that you want to inspire you for the year yet, it is not a big deal!  In fact, I am about to announce my word right now.  Are you ready? 


tranquil
 
I hope we had lots of wonderful quilters joining in the afternoon of fun next Saturday.  


Friday Night Sew-in: Laundry Bag


So, I decided to use some of the fats in my stash to make a laundry bag using a pattern by Fig Tree Quilts.  It is a super easy pattern.  I love it.  I do wish my finished bag was a bit bigger though.  It is going to be a gift for a HS graduate this spring.  I hope to embroider some complimenting towels as well.

Did you work on anything last night?

Thursday, January 20, 2011

Friday Night Sew In

Hooray....
I am going to do some sewing tomorrow night, I hope! 


Saturday, January 15, 2011

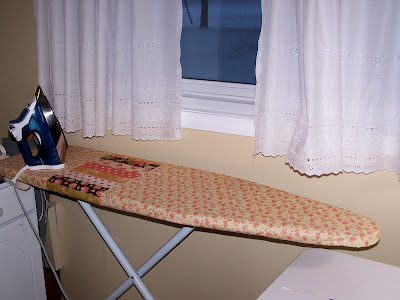
Saturday Sewing: A new iron board cover


Let me start by saying that today, a lot of things seemed to take longer, have more problems, etc. then they should have.  But, this stitching project went just fine, so we will just skip to that part.  This is a pattern that I used my Charming Girls Gift Certificate that I won on.  I already had the fabric.  For those of you who will want to know, it is Breakfast at Tiffany's by Fig Tree Quilts of Moda.  Big shout out to Fig Tree....love your collections. 

Anyway.  The pattern is called:  Patchwork Ironing Board Covers by Cottonway.  You can find it at Kelly's shop here for a very reasonable $6.80.  Go ahead, take a peek...I know you want to.  I have wanted to make a new cover for a replacement to my disgusting cover forever, I just never got around to it.  There are lots of nice, FREE tutorials out there in blogland, too, I just really liked the pieced look of these.  I had some Bliss, too.  I almost used it.  But, I am just not ready to stop hoarding it and start using it yet.
So, I did mine up in Breakfast at Tiffany's and I love it.  I think it is too pretty to iron on.  Hmm.  That is an entirely different problem, isn't it?


What have you been working on today?

Sunday, January 9, 2011

UFO Bust

Susan issued a UFO challenge.  I happen to have a few unfinished projects laying around that I'd like to see get done in 2011. 

Here is my list that I want to start with:

1.  red quilted purse/bag- been cut out for a bit
2.  yellow/green quilted purse/bag- already cut out
3.  red Amira purse
4.  Jolly quilt- quilting and binding
5.  Swanky quilt- quilting and binding
6.  Keyholes quilt- quilting binding
7.  NY Beauty quilt- quilting and binding.


Also, Kelly has issued a challenge to take the pressure off one's self and just enjoy sewing.  I signed up for both...I figure I am covered then!  LOL.  No really.  My intentions are to feel like finishing up some of these projects.  Wouldn't that be great?  I pull out that box of quilt tops...and it makes me feel bad.  They shouldn't be stuffed under a bed.

Saturday, January 8, 2011

Many thanks....

Sorry!  Seems like I took a bit of a blog break.  I had to return to work, and have just found myself a bit busy this week.  Plus, I must admit that I received a Nook for Christmas, and I have found myself glued to it.  First, I want to address the giveaway.  Allie, you are the winner!  Send me an email with your snail mail address and I will get your package out to you!!


Next up, apparently I won the giveaway for the Charming Girls Club this month!  Hooray!  Thanks so much to Kelly for all the work she does pulling us all together as quilters.  If you aren't familiar with Kelly, she is definitely a someone you should meet.  She has a great blog, which I love keeping up on.  She also frequently inspires us all to keep stitching.  I consider Kelly to be such a dear friend.  She is one of the kindest, warmest blog friends I have. 

She also has a wonderful online quilt shop, which I love to frequent, Cotton Charm Quilts.  Her prices are hard to beat.  I noticed she has some great new collections to entice you with right now, too. 

What are you working on today?  It is snowy these big fluffy flakes here...like my own private snow globe, I kid you not.  We are suppose to head to a Detroit Pistons game tonight with Buddy, so I hope the weather doesn't delay us. 

Also, I am making a new dinner today, Chipotle-Glazed roast chicken with sweet potatoes.  I had never visited Pioneer Woman's Tasty Kitchen blog, I must say I love it.  If you haven't visited, it is worth your time.

I do hope to get some stitching in sometime soon, maybe when the newness of my Nook wears off.